.png?width=200&name=Health%20Hawk%20Digital_Horizontal%20(3).png "Health Hawk Digital_Horizontal (3)")
When it comes to reaching new customers, few tactics are as powerful and effective as Facebook advertising.
The size of the platform, the number of users, the amount of data points Facebook has on its users, the control over the creative options - all this and more comes together to provide health and wellness business owners and practitioners with a platform capable of growing their business quickly.
But mastering Facebook is far from simple.
That's why we've put together this comprehensive, step-by-step guide tailored perfectly to healthcare businesses so that you can run your own successful Facebook and Instagram advertising campaign.
Before we start, a quick note: Facebook ads are also shown on Instagram, since Facebook owns both platforms. When you set up Facebook ads you also, by default, set up Instagram ads. You do have the option to turn this off, but we recommend you leave the default placements. From here out, when we say Facebook we mean both Facebook and Instagram.
Table of Contents
2. Creating a Healthcare Facebook Campaign
2.5.2. The Copywriting Process
3. Setting Up Your Reporting Dashboard
Pre-Campaign Requirements
Before you can actually start running a campaign, you need to have a few things set up in your Ads Manager, your website and make some crucial business decisions. Let's look at these in detail.
Note: this guide assumes you have a Business Manager account running, and that you are an admin of both the Business Manager and your Facebook page. If you need to set up a Business Manager, follow Facebook's instructions here.
Facebook Pixel
First things first, you need to set up your Facebook Pixel. If you have, awesome! If not, simply follow the instructions here to get it installed.
Standard Events
You'll also want to set up Events. This is simply the terminology Facebook uses to identify when someone takes a certain action on your website, such as viewing a page or filling out a form.
By default, when you set up the Pixel you'll get a Pageview Event, but you can also create custom ones depending on how users interact with your website.
A common Event is the Lead Event. This is when a website visitor completes a form, clicks a button, or visits a certain page that is only accessible once someone becomes a lead and you have their email address.
Setting up these custom events is an important, although not mandatory, aspect of running Facebook campaigns. This guide by Facebook will teach you how to set them up on your site.
Custom Conversions
Custom Conversions is similar to an Event - essentially it's a way for you to determine when someone takes a specific action on your website, such as making a purchase that is over a given amount. An easy example is someone purchasing a yoga mat worth more than $60.
Custom Conversions are really helpful for tracking the outcomes of your campaigns.
Let's say you're running a campaign to boost the number of bookings your yoga studio gets. A custom conversion can be set up that includes the URL of the booking confirmation page, and you can also set a monetary value of this conversion because you know how much each session costs.
When you look at how your ads are performing, you'll be able to see how many bookings you've taken, and how much money you've made - both crucial metrics to determine how successful your campaign was.
Setting up Custom Conversions is really easy. Again, Facebook has a guide on how to do it.
Business Locations
Unless you don't have a physical location where you see patients (for example, you only do virtual sessions with clients, or you visit them in their home), you'll want to add your location to your account so people know where they can visit after seeing your ad. Doing this allows Facebook to show your ads to people who are nearby, as well as remind them of any Offers they currently have (we'll cover this in a little bit).
Setting it up is really easy, you simply navigate to your Business Locations in Business Manager and add each store you have. Once again, Facebook explains how to do so here.
Decide on Your Value Proposition
A value proposition is a statement that explains the benefit of your product/service in a way that is meaningful for the customer. It takes your key benefits, and positions them as a solution to your client's problems.
Basically, it's a way of saying 'look how good we are at what we do' without being so forthright (people don't like that sort of thing).
Crafting a great value proposition takes time, and can be a very involved process, so here's our shortcut method:
-
Think of the 1-2 major problems your customer has
-
Think of the 1-2 major benefits of your product or service
-
Express those benefits in a way that they solve that problem
For example, the problems our clients have is a lack of time to invest in their own marketing, and the need to navigate the complex world of growing a business with sales and marketing by understanding the right strategy for them.
Our major benefits are our expertise and experience, and that we can manage their marketing for them.
When we take these two elements, we combine them to form our value proposition which is all about helping healthcare businesses grow by generating more enquiries in less time.
So what you want to do is come up with a single sentence value proposition that you'll later use in your ads (don't worry if you can't think of the perfect one right now, just have a rough idea as we'll cover creating ads in more detail later in the article).
Decide on a Timeframe and Budget
It is important to know how long you expect your ads to be running before you start creating your campaign. For some businesses it makes sense to run ads indefinitely, for others you may want to have a clear start and end date.
The correct approach depends on your business and your goals, as well as what you are promoting.
If you are offering a limited-time deal, such as a free trial, your ads only need to run for as long as the deal is valid.
On the other hand, you may want to run the ads forever since you are always looking to bring in new clients and business.
If you’ve run ads before you should know how much to spend and what you can get in return. If this is your first campaign, start small with an amount you are comfortable with, and know that you might not see a return on it initially and that you need to continually test and optimise your ads to improve your return on investment.
However, as a rough guide, we suggest starting with 50% of your Customer Lifetime Value (CLTV) per month.
CLTV is a metric used by marketers and business owners to figure out how valuable a customer is to a business, and helps them understand how much they can afford to spend to acquire new customers.
At a very basic level, CLTV is calculated by taking the annual revenue generated from all your clients and dividing that by the number of clients (for a more comprehensive calculation you should also consider how long a client will stay with you. For many businesses, clients stay for multiple years, and this will influence their CLTV, but for the sake of simplicity you can look at just one year of revenue).
For example, if you make $250,000 in one year from 500 clients, your CLTV would be $500 ($250,000 / 500).
So, using this approach, your monthly budget would be $250.
A lot of businesses have trouble deciding on a budget for their ads, so considering how much a new client is worth and using this as a basis for setting the budget removes the guesswork. It also forces you to think of your budget as an investment, rather than an expense. Instead of thinking 'I can't afford to spend $250 a month on advertising' you should really be thinking 'can I afford to spend $250 to bring in one new client?'.
Before we move on, there are some caveats we need to discuss.
Firstly, while this approach uses a calculation to set a budget that should be affordable, it does not take into account cash flow or any other costs of acquiring a client. Some businesses may bring in $500 in revenue per client, but the actual profit per client could be much lower. This could impact on cash flow, meaning your budget may need to be adjusted to something more affordable and sustainable.
Secondly, the assumption behind this approach is that you are spending $250 to get $500 in return, or, put another way, your ads bring in one new client each month. For some businesses this is not what will happen and you will bring in more clients than this. You may find yourself thinking that $500 per month in revenue is not worthwhile, but remember that this approach is used as a starting point and your budget can be adjusted over time once you see results from your ads.
Finally, this approach does not allow for a testing phase or set aside a budget for testing. Running a test period might be considered a bit more advanced, but this is something we do with all our clients because we want to be deliberate in finding what works. This requires a portion of the budget to be set aside for testing, and during testing, we actually increase the budget so we can get the results faster. Once we know what works we can adjust the budget accordingly.
Campaign Setup
The last thing I want to cover before we get into actually creating a campaign is explaining a good way to setup your campaigns to keep your Ads Manager organised and easy to understand.
When running ads, there are three elements - Campaign, Ad Set, and Ads.
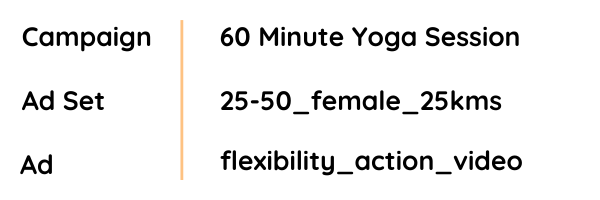
When we set up ads, the Campaign is the product or service we are promoting. So if you're selling a new dental care service, your Campaign name will be whatever the service is called, such as 'Invisalign'. If you're trying to get bookings for your free trial of a yoga class, your Campaign name will be 'Free Trial'.
Next, the Ad Set is all about the audience, so it should be named as such. For example, if your ads are going to be shown to all men aged 25-50 in Sydney, your Ad Set could be called 'Sydney_Men_25-50'.
Finally, the Ad is your actual ad. A good name describes the ad in a clear way, such as a combination of value proposition, creative elements and call-to-action. For example you could use 'pain relief_physio photo_learn more' if you were promoting your physiotherapy services for pain relief with a photo of you working with a patient.
Finding a naming system like this will make reporting on ads very easy, as you'll quickly be able to see what ads are performing and what sets them apart.
Creating a Healthcare Facebook Ads Campaign
Ok, we made it - this is what you came to this blog for. A step-by-step guide on creating, running and optimising your Facebook ads campaign. Let's jump in.
Campaign - Objectives
The first thing you'll be asked when creating your ads is what objective you want to pursue.
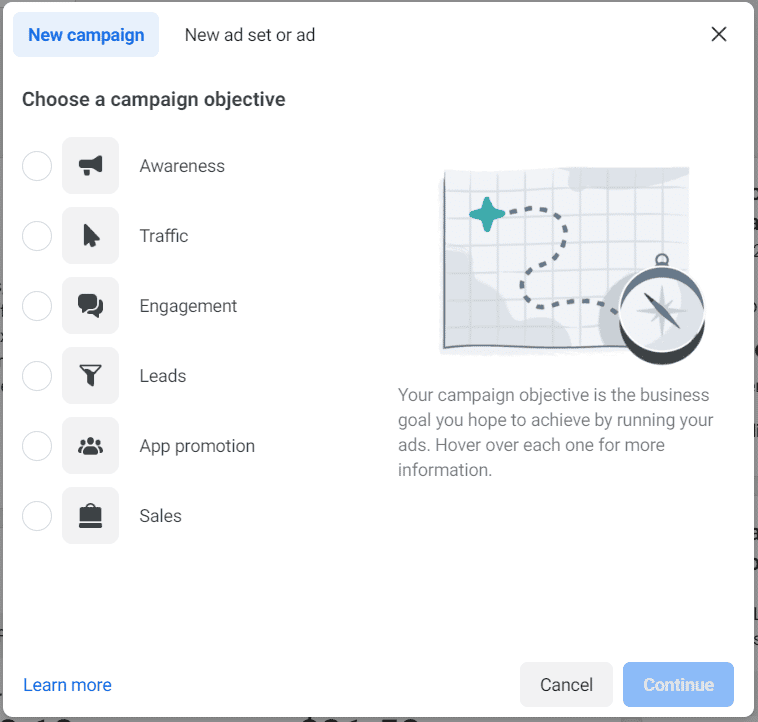
There are 6 objectives available, but the one that is right for you depends on what your business objective is. Always remember, with any marketing activity you do, you MUST tie it back to your business goals:
1. Awareness - use this objective when you want to get your ads in front of as many people as possible. This is good when you've had a great video produced and you want to show off your brand and business to people in your nearby area.
2. Traffic - use this when you want to drive people back to your website. This is good when you are promoting helpful, educational or entertaining content such as blog and you want people to come to your site to read it.
3. Engagement - use this when you want people to connect and engage with your Page. This could be them liking your posts, messaging you directly or responding to an event you are hosting.
4. Leads - use this when you want to generate new leads for your business through a form hosted directly on Facebook or on your website. This is good when you are promoting a new offer for free consultations or free trials and people need to fill out a form.
5. App Promotion - use this when you want people to download and use an app you've created. This could be useful for fitness classes where visitors need to book in via an app.
6. Sales - use this when you are selling a product or service that people can buy directly from your website or Facebook page. This is useful for brands who have a product catalogue they are promoting and want to increase sales.
Most health and wellness brands will benefit from choosing either 'Traffic' or 'Leads' since many businesses are running ads to generate new enquiries and these two objectives are best for this goal.
Campaign - Details
Once you've chosen your Objective you'll be taken to a new screen where you can add in further details about your advertising campaign:
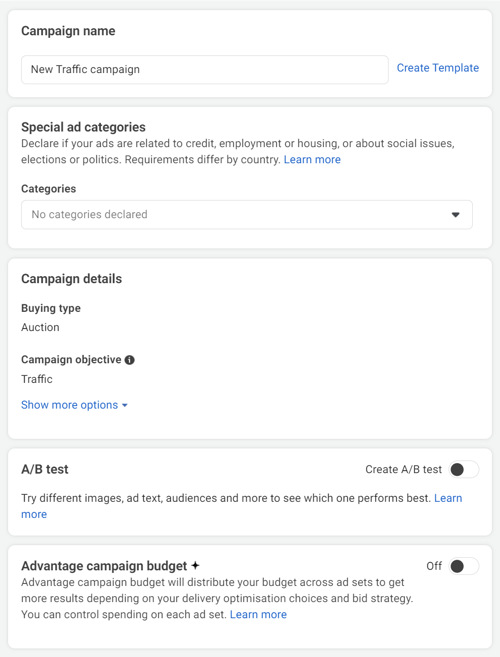
You should go ahead and name the campaign now using the naming convention previously discussed. You will most likely not need to select any Special ad categories, and you can leave the Buying type and objective at the default.
The A/B test feature is also something you can skip for now - the approach outlined in this blog lets the testing happen within the Ad Set itself by uploading multiple versions of your ads and letting them 'compete' against each other to see which resonates best with your audience.
This isn't to say the A/B test feature isn't useful - we use it ourselves to help run tests - but it can be a bit overwhelming at first, especially if you've never run a Facebook ads campaign first, so for this reason we recommend you leave it switched off for now.
You can also leave the Advantage campaign budget set to off, too. This feature allows Facebook to split your overall budget differently across your different Ad Sets (your audiences) so that more money is given to better performers.
Again, this is a useful tool, but unlike the A/B test feature, we don't like to use this option and prefer to manually allocate budget to our Ad Sets based on the results we are seeing. This approach is neither right or wrong, just the one we prefer.
Advanced Tips for Campaign Objectives
When it comes to choosing an Objective, here is an expert tip:
1. Avoid using the Lead objective, even if this is what you want.
Lead ads collect user information in Facebook, normally by prefilling their data. This makes it very easy for users to complete the form and get whatever it is you're offering.
This can actually be a bad thing.
Because it is so easy, you may find these leads are low quality, low intent leads. Because you made it easy for them to download they did so, even if they weren't 100% convinced by your ad.
On the flipside, if you instead sent them to a landing page on your website, where you had them download form, they have to take more steps in order to access your offer. This usually means they are more interested and can be higher quality, higher intent leads who are more likely to convert.
So instead of using Lead, use Traffic and send them to a landing page, with a custom Conversion Event to track ad performance.
Choose Your Audience
Two things have been proven to greatly influence success with Facebook ads - compelling copy, and audience selection. Later we will give you a step-by-step process for writing awesome ad copy, but first you need to think about what audience you want to target with your ads.
I won't go into creating an audience here, but I did publish an incredibly detailed blog explaining how to create the perfect Facebook audience for any healthcare business. If you haven't got an audience created yet, or if you do but want to improve it, go check out the blog and then come back here.
Campaign - Ad Set
Once you've selected your Objective, you'll move on to Ad Set specific details. As mentioned earlier, each Ad Set should be kept to a single audience. So if you have one audience of mothers who recently gave birth and are looking for a 'mums and bubs' fitness class, have one Ad Set for them.
There are a number of steps you need to take to correctly set up your Ad Set:
1. Conversion Location
Pick the relevant Conversion Location you want to optimise for - page views, purchases or a custom conversion you previously created.
2. Conversion Event (if you chose Leads or Sales)
You'll need to tell Facebook what Conversion Event you want to achieve in this campaign, either a Custom Conversion you set up earlier, and a Standard Event.
If you chose the Engagement objective, you will instead choose what engagement type (video view, post engagement, or event reponse) you are after.
3. Optimisation and Delivery
In this step you'll choose what event is most important to you, based on the objective you chose. If you wnet with Traffic, I recommend you choose to optimise for landing page views, since getting people to your website is your main goal.
If you chose Leads you should leave it at the default setting of Conversions.
You can also choose to enter a target cost per action, but this is only optional and is only recommended for advanced, experienced ads managers.
4. Budget
Here is where you'll enter your budget - either a lifetime or daily budget. The choice is up to and it really comes down to whatever option you feel is easiest to manage.
If you are running a campaign with no end date in mind, daily budget setting might be best for you. To do this, simply take your monthly budget you set earlier and divide by 30.
If your campaign has a clear end date, simply multiply your monthly budget by the number of months it will run and then set a lifetime budget.
If you're using Campaign Budget Optimisation (which I recommend if you have multiple Ad Sets), then all you have to do is select the start and end date of your campaign.
If you're running a Traffic campaign, you can also control when you want to pay for ads, and what Event you want Facebook to optimise for.
My recommendation is to optimise for Landing page views (since you want Facebook to show ads to people most likely to visit your page), or Impressions (if you're showing video content to generate brand awareness).
5. Audience
Here is where you choose the specific audience you are showing your ads to. Again, if you haven't already created an audience, here's a link to our comprehensive guide.
6. Placements
In this section you can control where exactly your ads will be shown. These include the Facebook Newsfeed, Instagram, Facebook and Instagram Stories, in-feed videos and more.
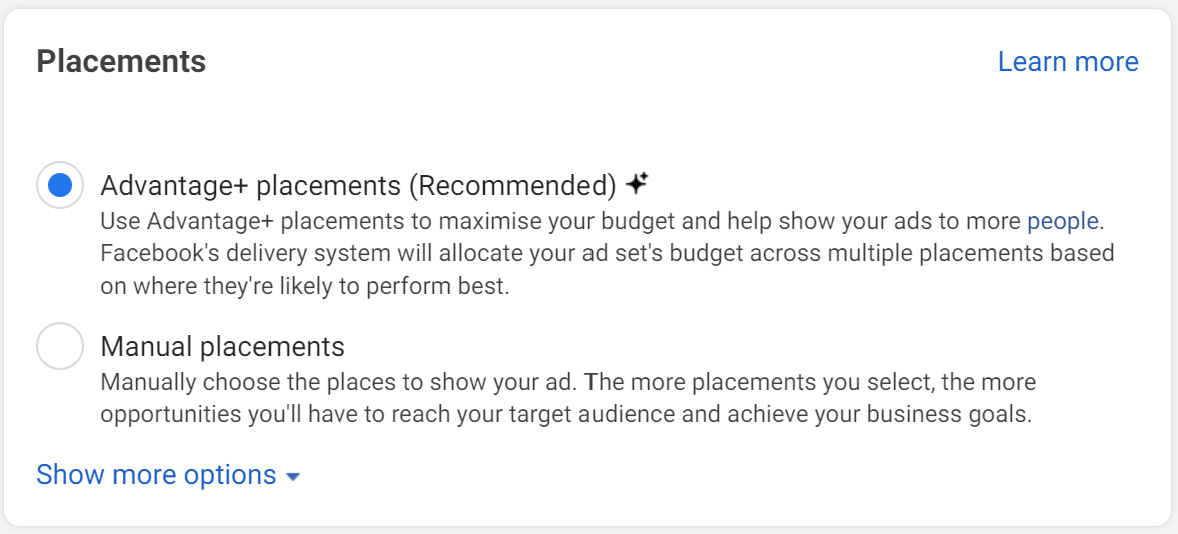
My recommendation is to leave this on Advantage and let Facebook decide where best to show your ads. Doing so makes your job easier, and also makes the most of an intelligent algorithm from Facebook.
Advanced Tips for Ad Sets
1. Avoid Dynamic Creative
Ok, this may be a bit controversial as so much of what we do as successful marketers on Facebook comes down to letting the algorithm work it's magic, but hear me out.
Dynamic Creative is where you upload a variety of images/videos as well as multiple versions of your copy, and let Facebook decide which combination is best by running AB tests automatically.
While this sounds good, the downside is that you don't get to see what combinations are working best. This means you don't learn what your audience likes and dislikes, and this can make it very hard to optimise your marketing for future campaigns.
Campaign - Ads
Up until this point, most of the work you've done has been technical - adjusting various settings, choosing the best option, optimising your audience selection.
Now we get to the creative side of things - creating your ads.
You may recall earlier we said that each ad should be a unique combination of imagery and text.
This is very important.
You can't test and optimise if you don't understand what elements are contributing to success or failure. Keeping each ad to a single value proposition makes it easy to see what is resonating with your audience.
With this in mind, a good name for an ad is:
Value Prop + Creative Characteristic
So for example, an ad that talks about the quality of your service, and that uses a video of it in action could be named:
Quality_Action_Video
Naming your ads like this will help you keep track of what ads are performing well and be able to quickly identify the differences between them. Using this naming convention means you can quickly tell if people care more about 'quality' or 'price', as an example of two value propositions.
The first thing I like to work on when creating a campaign is the creative - the image or video that will be used.
I personally use Canva for creating my artwork - it's a powerful, yet simple to use tool, that has a good amount of stock images and videos, as well as a number of animations to help turn static images into eye-catching gifs.
You'll also need to choose what type of ad you'll run, so you can create the appropriate artwork. Here's a rundown of each:
Carousel
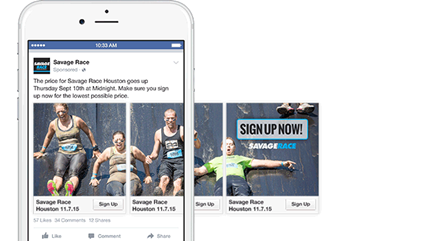
Carousel ads are those ones where you can scroll through a few different images/videos. They are really popular for retail businesses looking to promote multiple products, or when you want to highlight multiple features.
Images or Video
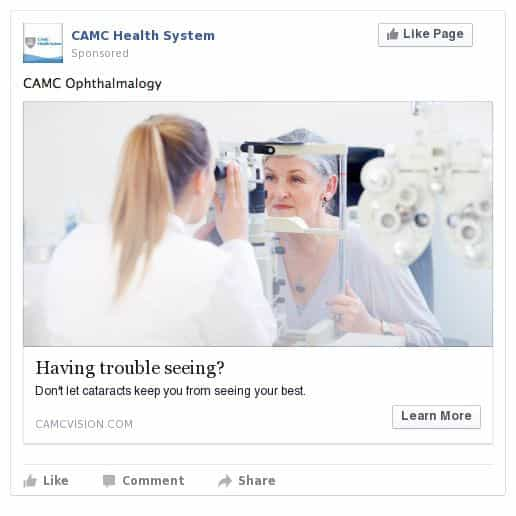
Most of the ads you'll either see or create are either static images or videos. They are simple to make, but can have big impact. They are also create at blending in with the newsfeed, which helps get around people's natural tendency to block out ads.
Collection
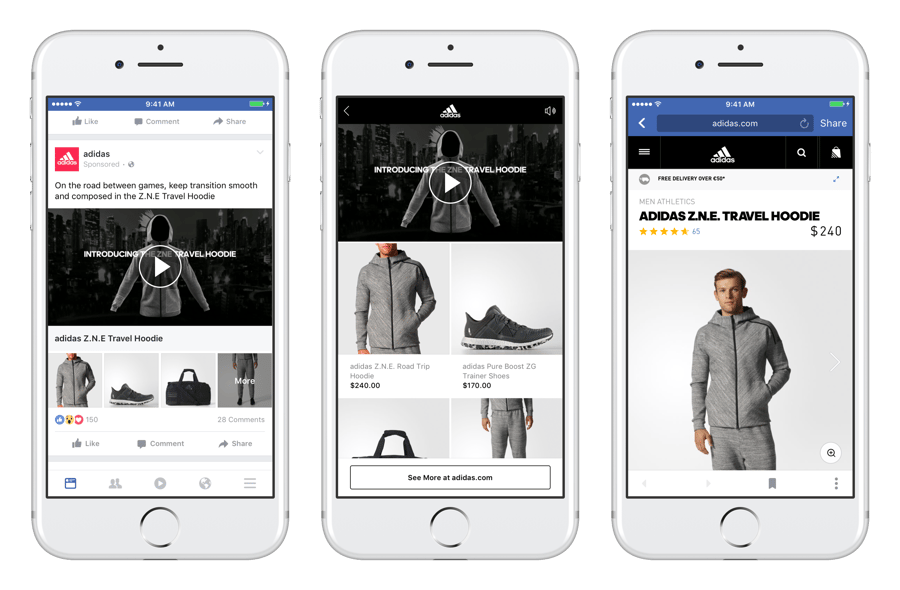
A Collection ad is similar to the Carousel, except with an added feature - they include an extended experience, viewable only on mobile, that helps explain your product or service in more detail.
These types of ads are very good at keeping people on Facebook and making it easy for you to showcase your ad beyond the images or videos.
Facebook also provides a range of templates to help you craft your Collection.
The Creative Process
When it comes to actually creating an ad, everyone has their own way of doing it.
I personally like to find a strategic, repeatable way to approach design work that streamlines the process and adheres to best practice and proven techniques. Here are the rules I adhere to when creating ads:
A. Use the Right Specs
The different placements offered by Facebook require different size artwork. These two pages explain how to create ads that fit properly:
B. Depict the Product/Service in Action
The best way to sell a product or service is to show your audience how it works.
If you offer a physiotherapy service specialising in back and neck pain caused by sitting at a desk for too long, use an image or video that depicts you in action. If you're a dentist who primarily works with children, use this as your image/video.
Your audience wants to be able to imagine themselves benefiting from your product or service, so help them do that by depicting it in action.
C. Explain What the Product/Service Is
Sometimes you need to use text in your video or image to convey your message. Depending on where the ad is placed (for example, in Stories) you may have to include your message in the video or image.

Even when you do have the opportunity to include text, such as in the Newsfeed, you want to make it easy for your audience to digest your message, and combining your creative and copy is a great way to so.
D. Create Multiple Placements
You'll want to create your ads in the following sizes:
- 1080px W x 1080px H - this is a square image and is best used for the Facebook and Instagram Feed, In-Stream Videos, and Overlay Ads in Reels
- 1080px W x 1920px H - this is a vertical image and will be used for Stories and Reels, and Apps
- 1260px W x 628px H - this is a landscape image and is used for the Right Column, Search Results and Instant Articles
If you're using Canva, you can easily resize your artwork to the specs needed for each placement, and simply move elements around to make it fit the new size.
Once you've created you ad and uploaded it to Facebook, you'll be shown a number of previews of your ad on both mobile and desktop.
Most importantly, you'll have a chance to upload new versions that fit the different placements better.
The Copywriting Process
When it comes to creating compelling copy for your ad, you've got 3 sections to use:
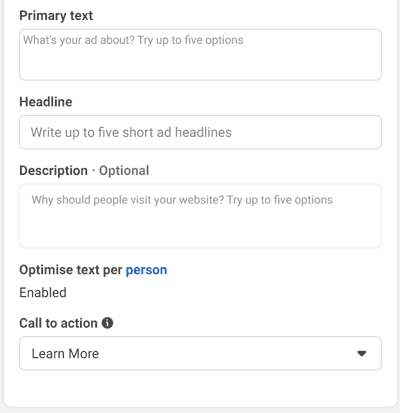
Primary text is the main text that accompanies your ad; Headline is what you see under the image/video; Description is optional and only shows on some placements, but can be a useful addition if you want to use it.
Copywriting can be a daunting prospect (even I have days where I dread having to do it) but great copy is one of the best skills you can develop as a marketer.
Becoming a great writer takes years of practice, but there are a few formulas and frameworks you can use to make it easier for you. When it comes to writing ad copy, here's my favourite way to approach it:
A. Decide on the Value Proposition to Convey
Earlier we discussed choosing a value proposition that you'll use for your campaign, so you can start with that.
If you have multiple Ad Sets (i.e. multiple audiences) you may need to use multiple value props, as what is important to one audience may not resonate with another.
B. Identify the Problem You Solve, and How You Solve It
Start out with a paragraph outlining the problem your product/service solves, and explain how you do it. Don't worry if it looks too long, because you won't be using the whole thing. The goal here is to get your thoughts down in writing that you can use as a starting point later.
C. The Value Proposition becomes your Headline, the Problem is Your Primary Text
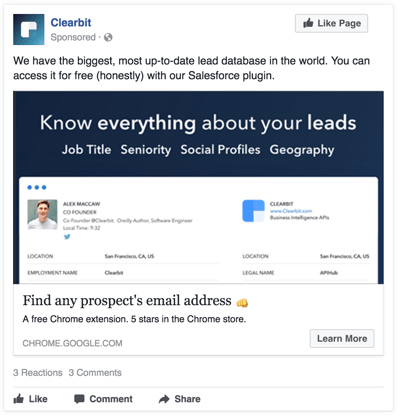
This is a great example of how an ad can be created that clearly outlines the problem facing the audience, how your product solves it, and explains your value proposition.
This is also a great ad because both the copy and creative work together, helping tell a continuous story that flows from text to image and back again.
D. Pick a Relevant Call-to-Action
For the Clearbit ad above , their call-to-action is 'Learn More' but you can choose from 17 options. Best practice is to pick something that gives the audience an idea of what will happen when they click the button or your ad. If you want them to book a meeting, use the 'Book Now' or 'Request Time' options. If you want them to download a resource, use the 'Download Now' button.
E. Create a Custom Display Link (optional)
This is an optional step, but useful if you have a super-long URL for the webpage you're sending users to. You can shorten the link to make it look neat and tidy, and also give a preview of what they can expect on the next page.
F. Repeat for Each Ad
When you're starting out, use only one Ad - this makes it easier for Facebook to find the right audience to show ads to during the Learning Phase.
Once you get familiar with the platform, understand the process of creating ads, and know what elements work best with your audience, you can start creating multiple ads within the Ad Set and manually AB test them.
Setting Up Your Dashboard and Reporting
So, you've just setup and launched your campaign - congrats!
But you're only halfway done. A great campaign only becomes great because you monitor it's performance and adjust course when needed.
Now we'll run through how to setup a custom Ads Manager Dashboard, which includes the key metrics you want to keep track of.
First thing is to go to your Ads Manager and click the 'Columns' button, and scroll down to 'Customise Columns'. You'll get a pop-up with all the options you can choose to include in your dashboard, but these are the ones you want to choose:
- Amount spent (how much did you spend on your ads)
- Results (how many conversions did this Ad/Ad Set get)
- Cost per result (how much did you pay per result)
- Reach (how many people saw your ad at least once)
- Impressions (how many times your ads were shown)
- Frequency (how many times each person saw your ad)
- Unique link clicks (number of people who clicked a link in the ad)
- Unique CTR (percentage of people who saw the ad and then clicked the link)
- Cost per unique link click (how much did you pay for each link click)
- Unique outbound clicks (number of people who clicked a link and left Facebook)
- Unique outbound CTR (percentage of people who saw your ad and performed an outbound click)
- Cost per unique outbound click (how much did you pay for each outbound click)
Monitoring your campaign daily is an important part of running Facebook ads. You usually don't need to make any changes until your ads have been live for about a week, but you still want to keep an eye and check daily to see if any errors are being reported.
Once your ads have been up long enough to see performance trends, you'll want to keep close attention to the following metrics:
- Results and Cost per result. It's important to track the results you're getting, and how much they are costing you.
- Unique outbound clicks, Unique outbound CTR, and Cost per unique outbound click. These metrics all show you how many people click your ad and go to your website, and how much these clicks will cost you. Monitoring these metrics will help you understand which Ads are performing better than others.
As you become more accustomed with running your own ads, and are looking to implement more advanced techniques such as AB testing, you'll find these metrics even more important.
Conclusion
We made it! Running a successful Facebook advertising campaign doesn't need to be difficult, but it does take a while to get the hang of things.
This guide has given you everything you need to know to get started managing your own ads and reporting on how well they are performing.
.png?width=60&name=Untitled%20design%20(37).png)
Brock is the founder of Hawk Health Digital, an experienced marketer and health and fitness enthusiast. With almost 10 years of experience in the industry, coupled with a Bachelors degree in Commerce and a Masters's degree in Marketing, he is an expert when it comes to helping health and wellness businesses achieve their growth dreams. When he isn't working you'll likely find him at a Japanese restaurant or on the beach with his wife, daughter, and their dachsund.